1
2
3
4
5
6
7
8
9
10
11
12
13
14
15
16
17
18
19
20
21
22
23
24
25
26
27
28
29
30
31
32
33
34
35
36
37
38
39
40
41
42
43
44
45
46
47
48
49
50
51
52
53
54
55
56
57
58
59
60
61
62
63
64
65
66
67
68
69
70
71
72
73
74
75
76
77
78
79
80
81
82
83
84
85
86
87
88
89
90
91
92
93
94
95
96
97
98
99
100
101
102
103
104
105
106
107
108
109
110
111
112
113
114
115
|
let log = false
const getFileName = (path, suffix = true) => (suffix ?
/.*[/\\](.*?)$/ :
/.*[/\\](.*?)\..*?$/).exec('/' + path)?.[1]
const toPascalCase = str => (
str = str.trim(),
str.replaceAll(/(?:^|-)(.)/g, (_, val) => val.toUpperCase())
)
const toKebabCased = str => (
str = str.trim(),
str.replaceAll(/[A-Z]/g, val => `-${val.toLowerCase()}`).slice(1)
)
const hasRouterByName = (router, name) => router.getRoutes().findIndex(v => v.name === name) !== -1
const hasRouterByPath = (router, path, parentName) => {
const allRoutes = router.getRoutes()
if (parentName) path = (allRoutes.find(v => v.name === parentName)?.path || '') + '/' + path
return allRoutes.findIndex(v => v.path === path) !== -1
}
const handlerPathByParentName = options => {
const { parentName, path } = options
if (parentName && path[0] === '/')
options.path = path.replaceAll(/^\/+/g, '')
if (!parentName && path[0] !== '/')
options.path = '/' + options.path
return options
}
const validRouter = (router, { parentName, ...routerOptions }) => {
if (hasRouterByPath(router, routerOptions.path, parentName)) throw new Error('path已存在:' + JSON.stringify(routerOptions))
if (hasRouterByName(router, routerOptions.name)) throw new Error('name已存在:' + routerOptions.name)
}
const addRouter = (router, options) => {
const { parentName, ...routerOptions } = options
if (parentName) return addChildRouter(router, options)
validRouter(router, options)
router.addRoute(routerOptions)
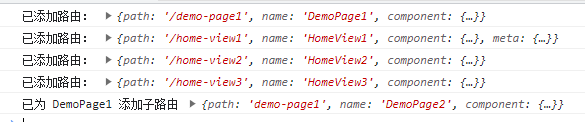
if (log) console.log('已添加路由:', routerOptions)
}
const addChildRouter = (router, options) => {
const { parentName, ...routerOptions } = options
let count = 0
const time = setInterval(() => {
count++
if (hasRouterByName(router, parentName)) {
clearInterval(time)
validRouter(router, options)
router.addRoute(parentName, routerOptions)
if (log) console.log(`已为 ${parentName} 添加子路由`, routerOptions)
}
if (count >= 50) {
clearInterval(time)
throw new Error('路由添加失败:' + JSON.stringify(options))
}
}, 50)
}
let defaultRequireList = []
try {
defaultRequireList.push(require.context('./views-auto', true, /\.vue$/))
} catch (e) {}
try {
defaultRequireList.push(require.context('./pages-auto', true, /\.vue$/))
} catch (e) {}
const autoRouter = ({
router,
requireList = defaultRequireList,
log: setLog
}) => {
if (!requireList.length) return
log = setLog
requireList.forEach(requireContext => {
requireContext.keys().forEach(relativeComPath => {
const component = requireContext(relativeComPath).default
const componentsName = toPascalCase(getFileName(relativeComPath, false))
const defaultRouterOptions = {
path: toKebabCased(componentsName),
name: componentsName,
component
}
const routerOptions = Object.assign(
defaultRouterOptions,
component?.routerOptions
)
addRouter(router, handlerPathByParentName(routerOptions))
})
})
}
export default autoRouter
|